Let me tell you a real story, that definitely happened.
With the announcement of Amazon Rekognition Custom Labels, we were trying to find a nice use-case to evaluate the performance of this new functionality. While we were thinking we got thirsty, so we ran to the fridge but instead of beverages, we found a surprise, the fridge was empty! “That does it!” said Chris, and he proposed a strange but very creative solution to our problem. “We are going to use Amazon DeepLens and Custom labels to track what products are missing from the fridge, we will never get thirsty again!”
In this post, we are going to see a use-case of Amazon Rekognition and Amazon DeepLens. We are going to use Custom labels to label some of the products in our fridge and then use DeepLens to capture images of our fridge. The ultimate goal here is to find out what products are lacking and what we need to buy. But first, let’s take a look at Custom Labels.
If you want to follow along you need to know a few things.
Training your model costs 1$ per hour, and with 4-5 images per label the training time usually is about 1 hour
Deploying your model in order to be able to invoke it is the most expensive one. It costs 4$ per hour the model is running. So make sure you stop the model after you finish with Custom Labels
Amazon Custom Labels
“With Amazon Rekognition Custom Labels, you can identify the objects and scenes in images that are specific to your business needs. For example, you can find your logo in social media posts, identify your products on store shelves, classify machine parts in an assembly line, distinguish healthy and infected plants, or detect animated characters in videos.”
In this section, we see how to create a project, create a dataset, label images, and train a model.
Create a project
To create a project is very easy, just go to the Rekognition page and click on “Custom Labels” on the left sidebar and follow the steps:
- Click on the “Get Started” button
- Provide a name for your project
- And click “Create Project”

In our case, we are going to create our rek-frigerator project in order to start recognizing products in my fridge.
Create a dataset
Now that we have a project, we need data to start training our model, and to provide our model with data we need to create a dataset. The steps here are equally as easy as the ones for the project creation.
- Click on “Datasets” on the left sidebar
- Click “Create Dataset”
- Provide a name for your dataset
- Select “Upload images from your computer”
- There are several options here and you are free to explore them. For the simplicity of this use-case, we are going to use images from our computers
- Click “Submit”
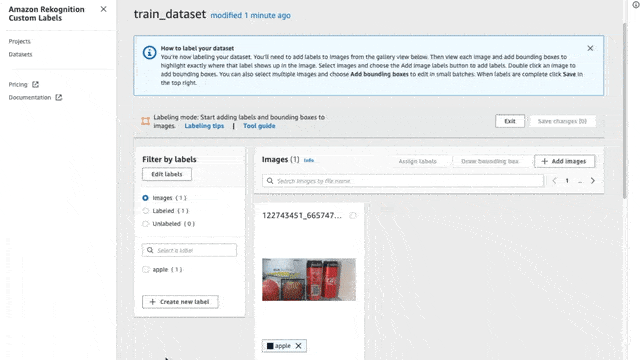
And voila! We have created a dataset, but wait… there are no images in this dataset! To add images simply click on the “Add Images” button and drag and drop any images you like to add.
Make sure you add at least 4-5 images for each potential label (we will see in the next section what labels are). In our case, I downloaded some images showing the specific carton of milk I like, and I also took some pictures with my phone, summing up to a total of 12 images showing the milk carton. I added some extra pictures showing some fruits (apples and bananas) to add some extra labels to the model (again I gathered at least 8 pictures for each label).
There is a limit of 30 images at a time when uploading from your computer, so if you want to add more images then you will have to connect it to an S3 bucket and upload them there.

Create Labels
To start labeling our new dataset we first need to define what are the labels. There are two methods to do that:
Create new labels
Import them from a previous dataset
Since this is our first dataset we are going to create new ones.
- Click on the “Add Labels” button (“Edit Labels” if you already have some)
- Select the “Add Labels” radio button and start adding labels, that’s it!
- Similarly, import labels from other projects

Here I created the labels that I would use:
- Apple
- Banana
- Milk
Label images
Create a project, check. Create a dataset, check. Add labels, check. Now we need to start labeling our images for the model.
There are two methods to label your images
- Label the whole image
- Create MBRs (minimum boundary rectangles) on the individual objects on the image
To label an image, first, make sure that you are in Labeling mode. To do that simply press the “Start Labeling” button. Once you are set, click the “Assign Labels” button, select the images that you want to assign labels, and select the label for each image.

Draw rectangles
The same way goes for drawing the rectangles around your desired objects.
- Select the images you want to assign labels
- Click on the “Draw Bounding Box” button
- Select the label from the right side section
- Draw the box
Here on each image, I will try to create bounding boxes on objects inside my fridge (only bananas, apples, and milk cartons). I annotated 44 images with some of them having two or more labels in the same picture.
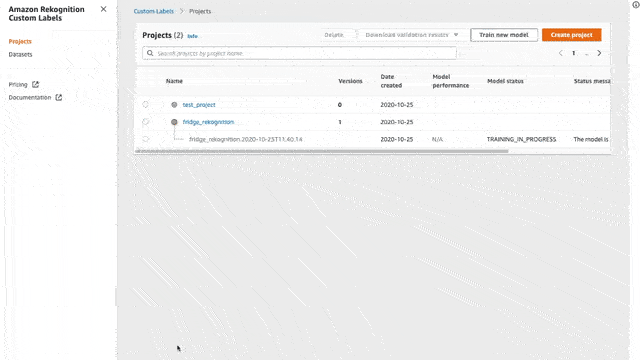
Train your Model
Now that we have all of our data labeled we will need to train our model in order to recognize our custom labels. To do that is again a few clicks.
- Go to your project and click the button “Train Model”
- Select the dataset that you have created in the previous steps with the labeled data
- And for now, let’s select the “Split training dataset”
This will take your entire dataset and split it in 80/20, 80% for training, and 20% for testing. The training time depends on the number of images that you have in your dataset.
Using our trained model
And finally, we have a trained model!! Now it is time to use our trained model and start finding stuff! First, we need to start the trained model, and by start, I mean to deploy it in order to be able to send images. Make sure to stop the model once you are done since it is a bit expensive. To do that we need to run a command through the AWS CLI
aws rekognition start-project-version \
  --project-version-arn "<model arn>" \
  --min-inference-units 1 \
  --region us-west-2
The model ARN can be found when clicking the model, each model is actually a version of our project and that is why it is referred to as “project-version-arn”.
This will take some time… Once our model is started we can invoke it using the following aws cli command:
aws rekognition detect-custom-labels \
  --project-version-arn "<model arn>" \
  --image '{"S3Object": {"Bucket": "MY_BUCKET","Name": "PATH_TO_MY_IMAGE"}}' \
  --region us-west-2
This will return a list of labels with their corresponding confidence. Yay!! We did it! Now let’s make it more readable and usable and create a python script that will answer all of our questions!
Source for this script and any other python scripts for Custom Labels can be found in the Rekognition Docs
Review our results
Firstly, let’s see how we are doing with milk.

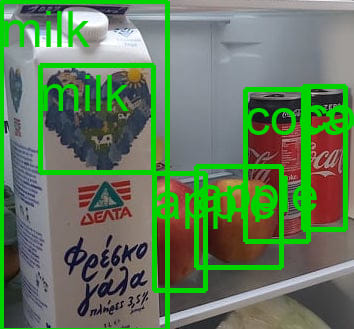
The model is trained correctly, but it seems we need close-ups on the images, and if there is too much noise the model cannot perform well. To fix this we need to add more images and more noise and retrain our model. In the following example, we can clearly see the problem.
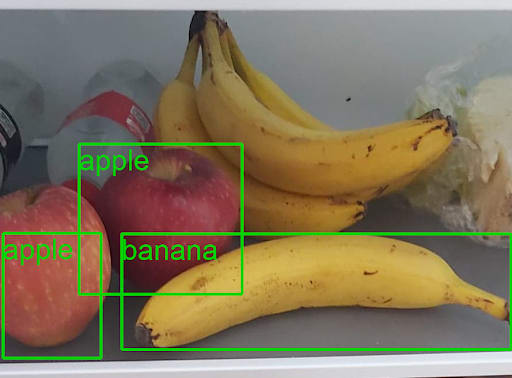
It should be able to detect the bunch of bananas in the back but there is much noise in the front.
Cleaning up
Make sure you clean up your environment. The inference of the model is a bit pricy. To stop your model run the following command
aws rekognition stop-project-version \
  --project-version-arn "<model arn>" \
  --region us-west-2
If you want to delete your data and your project, go to your Projects delete the project by pressing the button “Delete”.
The Fridge Camera

We decided to use AWS DeepLens for this project for a few reasons :
- It contained an IoT connected camera
- It was already integrated with AWS services
- It had a fisheye lens for wide view
- Bonus: it could do inferencing at the edge
We needed some kind of a trigger to know when the fridge was open. The traditional way to do this would be with an electric switch, but the DeepLens does not provide digital IO pins. We figured we could use an image recognition model to detect an object in the fridge, using that as a trigger instead. It didn’t matter what it was, we just needed something.
At first we thought about using text detection to look for a specific string (OU812, a tribute to Van Halen), but setting up OCR or other methods was going to add too much complexity for the amount of time we had. So we decided to use the 20 object detection model included in the DeepLens model examples.
output_map = {1: 'aeroplane', 2: 'bicycle', 3: 'bird', 4: 'boat', 5: 'bottle', 6: 'bus', 7 : 'car', 8 : 'cat', 9 : 'chair', 10 : 'cow', 11 : 'dining table', 12 : 'dog', 13 : 'horse', 14 : 'motorbike', 15 : 'person', 16 : 'pottedplant', 17 : 'sheep', 18 : 'sofa', 19 : 'train', 20 : 'tvmonitor'}Next we had to figure out what object to use. We’ve previously had a lot of fun detecting animals, but it didn’t seem practical to put a dog in the fridge (JK, we wouldn’t do that). Although at one point we did try putting images of dogs and even bicycles in the fridge, but again that wasn’t practical as it took up valuable space we needed for beer.

After some testing, we noticed the sample model wasn’t very good at identifying objects in the fridge, and to be fair, it wasn’t designed for food. We noticed that cans of beer were detected as “bottle” so we went with that. Other things were also detected as bottle, but we didn’t care because it wasn’t like an astronaut was going to be harmed if the model was wrong.

There were physical challenges in mounting the camera close enough to see the fridge, but without bumping our head into the camera. Lighting was also slightly challenging. Fortunately we had a good Vlogging tripod available, and some spare cardboard for precise positioning.
DeepLens Strategy
You might be asking yourself, why are we using Rekognition Custom Labels to identify the food when we could do this right on the DeepLens. As an IoT device, DeepLens doesn’t have the same memory and CPU resources as cloud based services such as SageMaker endpoints or AWS Rekognition. It wouldn’t be able to work with a model of the necessary size, remain fast, and of course be accurate. Beyond that, while it’s possible, it’s much less practical to continually re-train models and deploy them to an IoT device.
The object detection models available for DeepLens simply allow you to see the object detection on the “project stream” a local video stream from the camera that includes bounding boxes and labels around the detected objects. In order to do more fancy things, you have to roll up your sleeves and add some code.
There are great examples on the AWS ML blog which allows you to stream video to AWS Kinesis Video Streams (KVS) right from the DeepLens. The DeepLens already has a KVS library and IAM service role which allow this. While that would work with Rekognition as well, the issue here is capturing the right frame at the right time when the fridge is open, but the thirsty engineer isn’t blocking the camera with their arm or head.
We figured that the moment the fridge was open, and during that hang time when the engineer is visually hunting for their kill, the view of the fridge was unobstructed and our “trigger” object would be detected. If we captured this one frame and sent it to Rekognition (via S3 of course), this would be the simplest solution.
Although DeepLens supports the boto3 library and we have access to built-in functions like boto3.client and session.get_credentials(), the GreenGrassGroup service role does not have access to S3 by default. Of course you don’t want to give full access to S3 here, because someone could do a lot of damage if they could access your entire S3 service from an IoT device. Be vigilant and lock things down to the minimum necessary permissions.
I want to pause here and mention that this was a collaborative project involving two AWS accounts. Because of this, we didn’t have direct access to each other’s internal account resources, so we had to set up an API Gateway in order to transfer images and to kick off a Lambda function which calls Rekognition. While this sounds like extra overhead (it was), it’s really just an exercise in what a production level IoT product deployment would look like.
API Gateway & Lambda
Setting up the API almost deserves it’s own article, and we will add this later time permitting. You only need to do this in a cross-account setup. The code samples for DeepLens include uploading to a local S3 bucket.
DeepLens Coding
Our code edits to the existing DeepLens object detection example are pretty straight forward and needed the following components :
- Object Detected Conditional Routine
- Image Frame Rotation and Capture
- API Client
- Local S3 upload (optional)
- MQTT Publish Message (optional)
Near the top of our DeepLens Lambda function, we imported additional Python modules, and defined some simple API client functions using the powerful “requests” module. While you can do this in PyCurl, it’s actually a lot more lines of code and a bit more error prone, especially when doing a multi-part form POST with mixed data types (parameters and image data).
from botocore.session import Session
import requests
import json

API_KEY = "your-API-Gateway-Key"
ENDPOINT = "https://abcdefg.ou812-api.us-west-2.amazonaws.com/v1"

def get_presigned_url(image_name):
        headers = {"x-api-key": API_KEY}

        response = requests.get(
                ENDPOINT + "/upload/",
                params={"image_name": image_name},
                headers=headers
        )

        return json.loads(response.text)["response"]

def upload_file(image_path, s3_image_name):

        response = get_presigned_url(s3_image_name)

        with open(image_path, 'rb') as f:
                files = {'file': (s3_image_name, f)}

                upload_reponse = requests.post(response['url'], data=response['fields'], files=files)

        return upload_reponse

def rekognize(s3_image_object):
        headers = {"x-api-key": API_KEY}

        response = requests.get(
                ENDPOINT + "/rekognize/",
                params={"image_name": s3_image_object},
                headers=headers
        )

        return json.loads(response.text)["response"]
These functions will be called when the trigger object is detected. Be sure to instantiate your boto.client near the top of your GreenGrass Lambda (i.e. greengrass_infinite_infer_run) as well as start a session and get your credentials :
s3 = boto3.client('s3')
# Use the boto session API to grab credentials
session = Session()
creds = session.get_credentials()
The DeepLens examples usually just label any object that is detected and display it on the project stream. In our case, we want to do this only when a specific object is detected, as it just gets really noisy when trying to debug.
At the top of our while loop, we need to flip the image 180 degrees because the DeepLens camera is mounted upside down. We also need to grab a clean copy of the image frame without the bounding boxes printed as that would interfere with Rekognition.
while True:
    # Get a frame from the video stream
    ret, frame = awscam.getLastFrame()
    frame = cv2.flip(frame, 0)
    clean_frame = frame
    if not ret:
        raise Exception('Failed to get frame from the stream')
Next we just modify the for loop used for inference and reporting identified objects. We specify the bottle (5) from the output_map, and when present we apply a label to the image for the project stream, and set the flag “beer_present”. Beneath that we take care of naming and uploading our image to S3, then call Rekognition via the API Gateway and Lambda function.
# Dictionary to be filled with labels and probabilities for MQTT
cloud_output = {}
# Track whether or not at least one beer is preset
    beer_present = False
    # Get the detected objects and probabilities
    for obj in parsed_inference_results[model_type]:
        if obj['prob'] > detection_threshold:
            # Machine label 12 corresponds to a dog, if the label is present,
            # then at least one dog is in the frame
            if obj['label'] == 5:
                beer_present = True
                cloud_output['timestamp'] = time.strftime("%Y-%m-%d %H:%M:%S")
                cloud_output[output_map[obj['label']]] = obj['prob']
                client.publish(topic=iot_topic, payload=json.dumps(cloud_output))
                # Add bounding boxes to full resolution frame
                xmin = int(xscale * obj['xmin']) + int((obj['xmin'] - input_width/2) + input_width/2)
                ymin = int(yscale * obj['ymin'])
                xmax = int(xscale * obj['xmax']) + int((obj['xmax'] - input_width/2) + input_width/2)
                ymax = int(yscale * obj['ymax'])
                # See https://docs.opencv.org/3.4.1/d6/d6e/group__imgproc__draw.html
                # for more information about the cv2.rectangle method.
                # Method signature: image, point1, point2, color, and thickness.
                cv2.rectangle(frame, (xmin, ymin), (xmax, ymax), (255, 165, 20), 4)
                # Amount to offset the label/probability text above the bounding box.
                text_offset = 15
                # See https://docs.opencv.org/3.4.1/d6/d6e/group__imgproc__draw.html
                # for more information about the cv2.putText method.
                # Method signature: image, text, origin, font face, font scale, color,
                # and thickness
                cv2.putText(frame, "{}:    {:.2f}%".format(output_map[obj['label']],
                            obj['prob'] * 100),
                            (xmin, ymin-text_offset),
                            cv2.FONT_HERSHEY_SIMPLEX, 0.5, (255, 165, 20), 4)
    if beer_present:
        image_name = str(time.strftime("%Y_%m_%d_%H_%M")) + '.jpg'
        image_string = cv2.imencode('.jpg', clean_frame)[1].tostring()

        s3.put_object(Bucket="ou812-beer", Key = image_name, Body=image_string)
        image_path = '/tmp/' + image_name
        cv2.imwrite(image_path, frame)

        response = upload_file(image_path, image_name)

        cloud_output['upload_msg'] = ("Upload: {'successful' if response.status_code == 204 else 'failed'}")
        cloud_output['upload_response'] = (response.text)
        cloud_output['rekognize_status'] = (rekognize(image_name))

        client.publish(topic=iot_topic, payload=json.dumps(cloud_output))
        time.sleep(wait_time)
        beer_present = False
    # Set the next frame in the local display stream.
    local_display.set_frame_data(frame)
That’s it! Of course there’s always room for improvement and this is a great foundation to build upon.
About The Authors
Siaterlis Konstantinos is a Pythonista, AWS Community Builder, and passionate Data Scientist living in Greece. You can learn more about him on the website The Last Dev
Chris Miller is an entrepreneur, AWS Community Builder, and life long learner living in Santa Cruz, California. You can learn more about him on the website Cloud Brigade
What’s Next
If you like what you read here, the Cloud Brigade team offers expert Machine Learning as well as Big Data services to help your organization with its insights. We look forward to hearing from you.
Please reach out to us using our Contact Form with any questions.
If you would like to follow our work, please signup for our newsletter.