MikroTik L2TP VPN Setup
During my efforts to establish an L2TP VPN on our MikroTik RouterOS I poured over countless guides and tutorials. So when I finally had a working VPN what did I do? Wrote my own guide of course! This guide uses the WebFig interface, but the principles apply to WinBox as well.
The biggest problem I faced during this configuration was the Phase2 IPsec Policy Proposal. After identifying this as the roadblock I used trial and error to identify a policy that worked with High Sierra’s L2TP over IPsec VPN interface. This is not to say that this is the only configuration that will work, but this is the one that I found to work with system I had available for testing.

Create PPP Profile
PPP > Profiles > Add New
Name: <name your profile>
Local Address: <router interface on private network>
Remote Address: <address on private network or pool from private network>
Bridge: Internal

Create PPP User
PPP > Secrets > Add New
Name: <name your user>
Password: <create a secure password for the user>
Service: any
Profile: <select PPP profile from previous step>

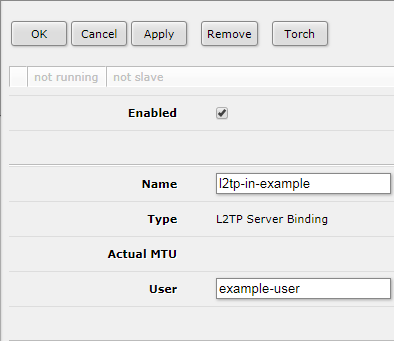
Create L2TP Server Binding
PPP > Interface > Add New > L2TP Server Binding
Name: <name your server binding>
User: <enter user from previous step>
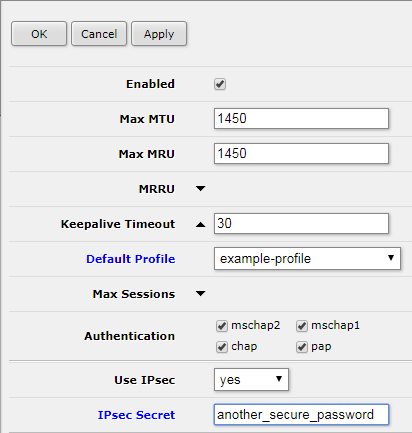
Enable L2TP Server
PPP > Interface > L2TP Server
Default Profile: <select PPP profile from previous step>
Use IPsec: yes
Password: <create a secure password for L2TP>
Add Firewall Rules to allow IPsec
IP > Firewall > Add New
Rule 1
Chain: input
Protocol: 50 (ipsec-esp)
In. Interface: ether1
Action: accept
Rule 2
Chain: input
Protocol: 17 (udp)
Dst. Port: 500,1701,4500
In. Interface: ether1
Action: accept

Move these Rules above any Drop rules.
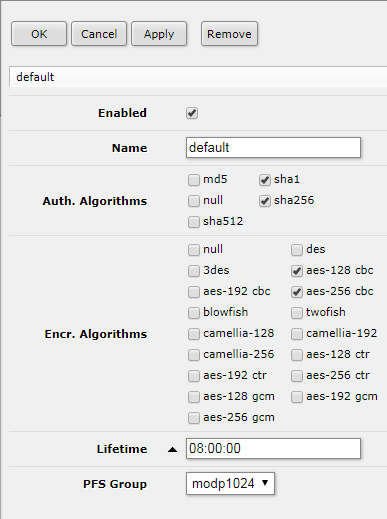
Edit IPsec default Policy Proposal
Enabling the L2TP Server will create an IPsec Peer which uses the default policy. It is necessary to edit the default profile to connect to the VPN with a Mac.
IP > IPsec > Policy Proposals > default
Auth. Algorithms: sha1, sha256
Encr. Algorithms: aes-128 cbc, aes-256 cbc
PFS Group: modp1024
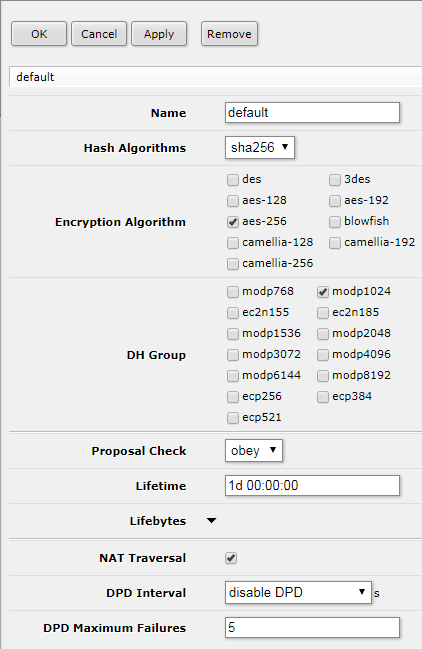
Edit IPsec default Peer Profile
Below is a Peer Profile configuration that is confirmed to work with High Sierra L2TP over IPsec VPN.
IP > IPsec> Peer Profiles > default
Hash Algorithms: sha256
Encryption Algorithm: aes-256
DH Group: modp1024
Proposal Check: obey
NAT Traversal: <checked>
Connecting to the L2TP VPN on High Sierra
You will need to add a new VPN interface.
System Preferences > Network > + (Create a new service)
Interface: VPN
VPN Type: L2TP over IPsec
Server Address: <L2TP Router’s Public IP Address>
Account Name: <PPP user>
In Authentication Settings you will need to enter two passwords.
User Authentication: Password: <PPP user password>
Machine Authentication: Shared Secret: <L2TP server password>
It may also be necessary to check the box for ‘Send all traffic over VPN connection’ in the Advanced options.
Connecting to the L2TP VPN on Windows 7
Control Panel > Network and Internet > Network and Sharing Center > Set Up a Connection or Network > Connect to a workplace
Do you want to use a connection that you already have? No, create a new connection
How do you want to connect? Use my Internet connection (VPN)
Internet address: <L2TP Router’s Public IP Address>
Destination name: <name your VPN connection>
User name: <PPP user>
Password: <PPP user password>
Don’t connect now; just set it up so I can connect later <checked>
Control Panel > Network and Internet > Network Connections > <Destination name> > Properties > Security
Type of VPN: Layer 2 Tunneling Protocol with IPsec (L2TP/IPsec)
Advanced settings > Use preshared key for authentication
Key: <L2TP server password>